

Aug 05, 2014
So, you have developed an exciting formula somewhere that works perfectly by extracting some value from a specified range and you are quite proud of it. Then one day, someone adds a new row to that range and your formula no longer works because the range was set to only include a set number of rows and columns. Today, I’ll show you how to keep these ranges in tact when using older versions of Microsoft Excel. Let’s take a look at this example. Here, we have named the highlighted table ‘Contacts’ and used this name in the VLOOKUP function to retrieve the phone number for Andrew Fuller.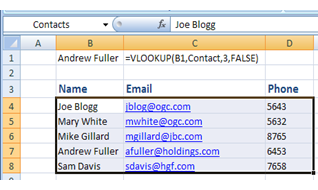
=OFFSET($B$4,0,0,COUNTA($B:$B),3)
This formula gives a range that includes the entire range that we really want, meaning that ‘temp’ is a bigger range than what we are aiming. Note, you should change these values according to the position of your table. I’ve explained the different parts of the above formula in relation to my data.- ($B$4,0 refers to the beginning of our range.
- COUNTA($B:$B) returns the number of non-blank rows in the first column. We could also write COUNTA($B4:$B1000000) instead but the former is more elegant.
- The number 3 at the end refers to the number of columns we are including in the range.
- So you should change these values according to the position of your table.
= OFFSET(temp,0,0,MIN(IF(ISBLANK(temp),ROW(temp),””))-4,3)
In this case, the number 4 refers to the row number of the beginning of your range, which in my data, is the row number of ‘Joe Blogg.’ Again, number 3 refers to the number of columns we have included in the range. Now that you have your two ranges set up, you should be able to add any number of rows to the range and use the same formula without any modifications. The elegance of this method is that if you have any other table located underneath the ‘Contact‘ table, that table will not be included in the ‘Contact‘ table, as long as there is a blank row between the two tables as shown in the figure below.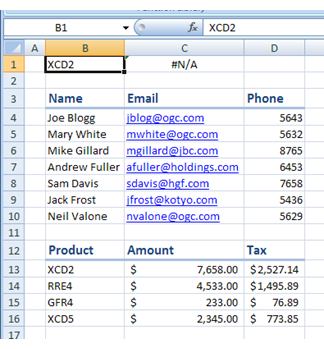
How do your Excel skills stack up?
Test NowRelated Articles


About the Author:
Cyrus Mohseni

Having worked within the education and training industry for over 15 years as well as the IT industry for 10 years, Cyrus brings to New Horizons a wealth of experience and skill. Throughout his career he has been involved in the development and facilitation of numerous training programs aimed at providing individuals with the skills they require to achieve formal qualification status. Cyrus is a uniquely capable trainer who possesses the ability to connect with students at all levels of skill and experience.
Read full bio


Next up:
- MH-17 and words
- Run the Runbook Tester in System Center 2012 R2
- Easily delete blank rows from your data using Excel VBA
- Synchronising concurrent access to data in C#
- The enhanced Presenter View in PowerPoint 2013
- 4 techniques to improve your active listening skills
- Networking requirements planning in Lync Server 2013
- An epiphany about the cloud
- How to create a simple Waterfall chart in Excel
- The basics of cloud computing
Previously
- Get online with Lync Online
- Creating multiple signatures in Outlook
- Become an ace in Microsoft Azure SQL Database
- Assertiveness – From theory to practice
- Returning multiple lookups using Excel’s VLOOKUP
- Get your head into the cloud for free!
- Remove excess spaces from data in Microsoft Excel
- Crash course in Microsoft Azure SQL Database
- Interviewing and avoiding the artful dodger!
- Access your Access files in Microsoft Project
