


May 13, 2014
When you create a form in Microsoft Word to capture information that is to be entered by another user, a few problems may arise. The problem that occurs will depend on how you created the lines in your form. The main problem is that the blank line that you put as a place holder for them to fill in, moves and then in turn, wraps over to the next line, as seen in the image below.

![]()
- In your Word document, go to the 'Insert' tab and select the 'Table' drop down arrow. In a generic form, you can usually have two fields on the same line so for this example, choose 4 columns and 4 rows.
- Type the name of the field for the first item in the top left cell. For example, if you were creating an enrolment form, you first field may be 'First Name.'
- On your keyboard, click 'Tab' twice to leave a blank cell and then type 'Last Name' in the third column. This should leave the next cell to its right blank.
- In the second row type 'Address.' I recommend that you select the rest of the cells in that row and merge it to create more space for this field. To do this, highlight the empty cells, right-click and select 'Merge Cells.'
- Similarly to step 2 and 3, add 'Suburb' and 'Post Code' in the third row.
- Again, add 'Course Date' and 'Course Name' in the forth row as above. Your table should now look somewhat like this:

- If you haven't used the 'Developer' tab before, you'll have to add this. To do this, go to 'Options' under the 'File' tab. Under the 'Customise Ribbon' section, you need to tick the box next to Developer on the right side. You should now see an extra tab in the ribbon. Once you click this, you will be using the 'Controls Group.'
- For the first blank to the right of the first name field, you will need to add a plain text field. Click in the cell where you want the field to be and in the Controls group, click on the second button in the top row. This button is a thin black outline of the letters 'Aa.'
- Repeat step 2 for the blanks next to last name, address, suburb and postcode.
- For the course date, you will need to use the date picker option. This is the first button in the third row of the Controls group, which has a little calendar grid icon.
-
For the course name, use the drop-down list option for consistency and to avoid any typos. The drop-down option is the third button of the second row. Your table should look somewhat like the below.

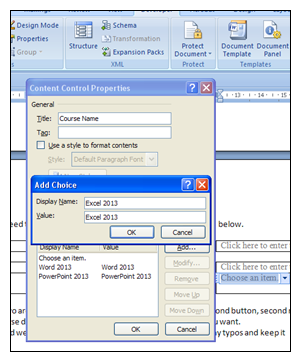
- To customise the options in the drop-down list for the 'Course Name' field, click on drop-down field you have created and then select the 'Properties' button in the Controls group. Type in as many items as you need and click OK.
- If you want to make your table less obvious, you can remove the borders of the table. To do this, select the table and under the 'Design' tab, click on 'No borders' in the 'Table Styles.'

How do your Excel skills stack up?
Test NowRelated Articles


About the Author:
Liz French

With over 7 years of experience as a trainer, and an extensive skill set that spans across the entire Microsoft Office suite of applications, Liz brings an incredible amount of knowledge, expertise and care to each course she delivers. Having worked as a tutor in the education sector for many years prior to her career at New Horizons, Liz has gained an extensive amount of experience in providing training to individuals and groups of varying skill levels. As a certified Microsoft Office Master, Liz is a highly capable trainer who possesses the ability to connect with students of all levels and backgrounds in order to help improve their skills across a wide range of common Desktop Applications.
Read full bio


Next up:
- EAs and PAs: Asking your boss the right questions
- VBA Excel: Finding the last row of a worksheet (Part 1)
- Implementing Big Data Solutions in SQL Server 2014
- Use slicers to filter table data in Microsoft Excel
- Hyper-V – Enhanced
- On being a Professional Development trainer
- Help! I typed in the wrong dimensions for my InDesign document!
- How to set up a Windows 7 and 8 HomeGroup
- VBA Excel: Finding the last row of a worksheet (Part 2)
- Mobilising SharePoint 2013
Previously
- The Exchange Admin Center (EAC) of Exchange 2013 - It's new!
- Becoming a great workplace trainer starts with three words (Part 1)
- Response Groups in Lync Server 2013
- Calculate the Resources Standard Rate in Microsoft Project
- An introduction to cloud computing
- Turn the heat up on your text in Photoshop
- How to access Office Applications from within VBA
- Dependency Injection in C#
- Customise the Quick Access Toolbar in Microsoft Office
- What's new in Microsoft Exchange Server 2013 SP1
